Why most fabric baskets slump — and how to stop yours
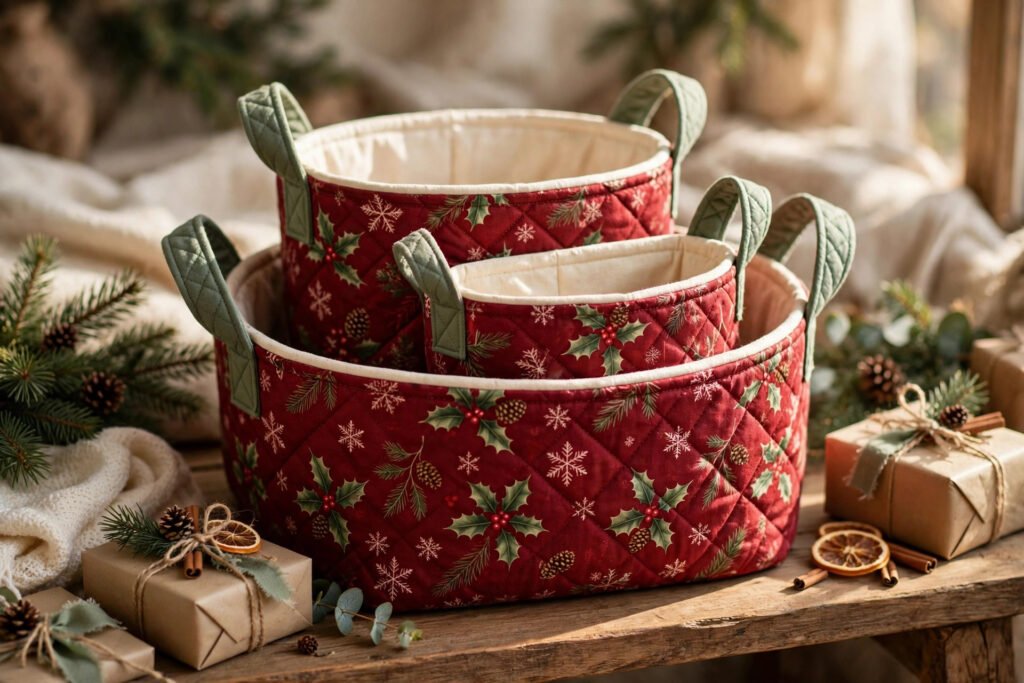
A fabric basket that slumps is not a basket, it is a bag with ambitions. The difference between the two is almost entirely in the layers and the corners, not in the sewing skill required. That is why learning how to sew quilted christmas fabric baskets is such a good project for a beginner who wants a genuinely useful result: the techniques are simple — straight lines, boxed corners, handles — and the payoff is a set of three baskets that hold their shape empty, hold gifts without collapsing, and nest neatly for storage.
A graduated set of three, with square bases of 15, 20 and 25 cm, covers almost every Christmas job. The small one holds stocking fillers and small gifts. The medium one holds a hamper. The large one holds a blanket, a pile of presents, or the entire contents of a stocking that got out of hand.
What makes a basket stand up?
Firm interfacing, not just batting
Light batting gives a basket softness, but softness is the enemy of standing up. These baskets use firm interfacing or heavy batting between the outer and the lining, and that firm layer is what turns flat fabric into walls. If your basket slumps, the interfacing was too light. It is better to over-stiffen slightly than to under-stiffen: a basket that is a little crisp still looks deliberate, while a basket that folds in half looks unfinished.
Boxed corners do the structural work
A flat piece of fabric becomes a basket when you box its corners. Sewing across each corner triangle creates a base and four walls in one step, and the depth of the box determines how tall the basket stands. Sew the corners evenly, press them flat, and measure: four corners boxed to the same depth give a basket that sits level, while one corner boxed deeper than the others gives a basket that rocks.
What you need before you start
Fabric and interfacing
You need outer cotton, lining cotton and firm interfacing for each basket, about 0.8 metres of each for the set. Christmas prints with medium motifs suit baskets well, because a basket shows a lot of fabric at once and a tiny print can look busy across a large wall. For the lining, a plain cream keeps the inside bright, which matters when you are hunting for something at the bottom of a deep basket.
Handles
Each basket needs two handles, cut 20 cm long and 5 cm wide, six in total for the set. Sage green handles against a red print are a classic Christmas combination, and matching handles across all three sizes is what makes the set read as a set. Cut all six handles at once so they match exactly.
Step 1: Quilt and shape each basket
Layer and quilt
Layer each basket piece with the outer over firm interfacing over lining, and quilt straight lines about 4 cm apart. Straight lines suit baskets perfectly, because the grid reads as texture and reinforces the firm layer at the same time. Work from the centre outward so the layers cannot shift, and baste well: a basket piece that shifts while quilting will pucker, and puckers show on a large flat wall.
Box the corners
Sew each piece into a tube, then box all four corners by sewing across the corner triangles. This is the step that turns fabric into furniture. Make the small basket first and check that it stands before cutting the larger sizes. A corner method that works at 15 cm is the method to repeat at 25 cm, and finding a problem on the small basket costs far less fabric than finding it on the large one.
Press every corner flat
Press each boxed corner flat before topstitching. A corner pressed flat stays square, but one sewn over a fold will always puff out, and a puffed corner is a basket that will never sit level. Take the time here; pressing is not wasted time, it is the difference between handmade and homemade.
Step 2: Handles and top edge
Make all handles before sewing any on
Fold each handle strip in half lengthways, stitch and press it, and make all six before sewing any handle to a basket. Handles made one at a time drift in width, and a basket with one fat handle and one thin handle looks wrong even if nobody can say why. Consistency first, attachment second.
Sew handles to opposite sides
Sew two handles to opposite sides of each basket, catching them firmly in the top edge, and tug each handle hard before finishing. A handle that pulls out the first time the basket is lifted is a handle sewn too shallow. Sew over the handle ends twice: the handles carry the whole basket’s weight every time it is lifted, and twice-stitched ends are cheap insurance.
Finish the top edge
Finish the top edge of each basket with binding or a neat topstitch, keeping the stitch line even all the way round. The top edge is the most visible part of a basket, because it is the part at eye level on a shelf. An even top edge makes the whole basket look professional, whatever happened inside.
Step 3: Nest and fit check
Check that each basket stands empty
Press all three baskets and check that each one stands upright empty. A basket that slumps empty will slump full, and there is no point gifting a basket that only works when it is packed tight. If a basket slumps, the fix is usually a firmer interfacing on the next one, not more topstitching on this one.
Nest the set
Nest the set small inside medium inside large and check the nesting is snug without forcing. A nested set stores tidily between Christmases, which is a real selling point for a gift: the recipient can put the set away in the space of one basket. If the small basket rattles inside the medium one, the sizes are right and the nesting is working; if it jams, check that the corners are boxed to the same depth.
Fit check on your own shelves
Try the baskets on your own shelves and with your own gifts before gifting, and confirm the large basket fits where it will live. A 25 cm basket is bigger than it sounds on a crowded shelf, and a basket that does not fit its shelf will live on the floor, which defeats the purpose.
Mistakes that spoil an otherwise good basket
Interfacing that is too light
This is the number one basket mistake, and it is made with the best intentions: light interfacing is easier to sew. But easy to sew and good to use are different things. Use the firm interfacing. Your machine can handle it, and your basket will thank you.
Corners boxed to different depths
Measure the corner triangles before you sew them, and sew all four to the same depth. A basket with uneven corners rocks on a table, and a rocking basket is a basket that spills.
Handles sewn to adjacent sides
Handles belong on opposite sides, not next to each other. Handles on adjacent sides make a basket that lifts crooked and spills. It sounds obvious, and it is the easiest mistake to make when you are sewing quickly.
Ways to make the set your own
Mix prints, keep the handles constant
Three baskets in three different Christmas prints, all with sage handles, look like a designed collection rather than three leftovers. This is also the fastest way to use up larger fabric pieces that are too big for small projects and too small for quilts.
Baskets that earn their shelf space
Quilted fabric baskets are one of the most useful things a beginner can sew. They teach layering, quilting, boxed corners and handles on a forgiving scale, and they produce something that gets used every day in December and stored neatly in January. Use firm interfacing, box the corners evenly and check that each basket stands empty.
Ready to sew the set? The full pattern with the true-size basket template is here: Quilted Christmas Fabric Baskets Sewing Pattern. And for a small matching gift, read How to Sew Quilted Christmas Gift Card Holders next.