Why fabric wraps beat paper, year after year
Wrapping paper is used for about ten seconds and then thrown away, and the prettiest paper is often the least recyclable. Fabric wraps are the opposite: they are part of the gift, they come back next year, and they make even a simple present look considered. Learning how to sew reusable fabric gift wraps is a perfect November project, because the wraps are ready long before the December rush, and they turn every gift you give into a small statement about waste.
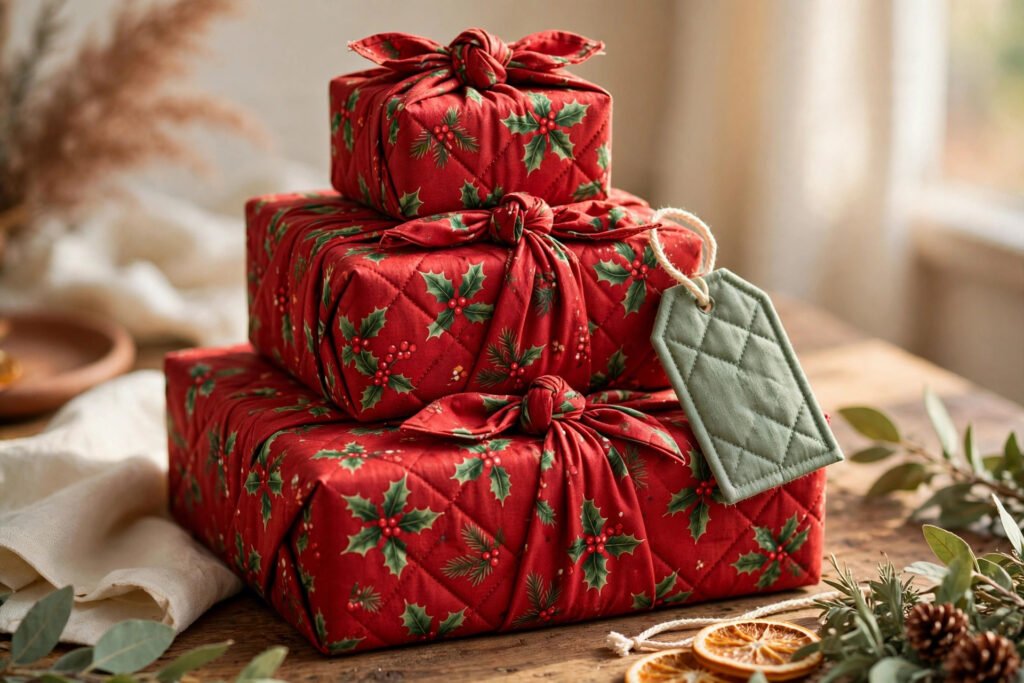
The wraps in this guide are Furoshiki-style squares in three sizes: a small 45 cm square for books and boxes, a medium 60 cm square for clothes and toys, and a large 75 cm square for big boxes and awkward shapes. Each wrap is quilted lightly, so it keeps some body, but still folds softly around a gift, and each one comes with a reusable gift tag, so no paper tag is needed either.
Choose fabric that folds, not fabric that fights
Quilting cotton, light batting, wide quilting
Choose quilting cotton for the outer and a plain cotton for the lining. Quilting cotton presses crisply and comes in Christmas prints that read well at any size, and a plain lining keeps the inside calm when the wrap is folded open. Use a light batting, and quilt it with wide-spaced lines about 8 cm apart. That spacing is the whole secret: tight quilting would make the wrap too stiff to knot, while no quilting at all would make it flop. Wide quilting gives the wrap body without taking away its drape.
Prints that work at every size
A medium-scale print works best across all three sizes, because the same fabric may be used for a 45 cm wrap and a 75 cm wrap. Very large prints can be lost on the small wrap, while very small prints can look busy on the large one. A mix of a Christmas print on the outside and a coordinating solid on the lining gives a clean, intentional look, and it means the wrap looks good from both sides, which matters when the knot is on top and the lining shows.
Cut squares and quilt them simply
Cut the outer fabric, batting, and lining to 75 cm, 60 cm, and 45 cm squares, one set per size. Squares are cut by measurement, not by template: measure twice, cut once, and check each square corner to corner, because a wrap that is not square will not fold into a neat parcel. Press all pieces before you sew, because creases from the shop can make large squares harder to align, and a 75 cm square that starts crooked will finish crooked.
Layer each square with the outer over batting over lining, and pin from the centre outward, because a large square that shifts while you sew will never lie flat again. Quilt wide-spaced lines 8 cm apart across each square, working from the centre outward so the fabric stays flat. Trim every square true and square after quilting, measuring corner to corner, before finishing the edges.
Finish the edges and make the tags
Turn the edges of each square in and press them flat, then topstitch all round close to the edge, keeping the stitch line even, which finishes every raw edge in one step. Press each edge before you topstitch past it: an edge pressed flat stays flat, but one sewn over a fold will always puff up. Press every wrap flat and stack the set, checking that each square lies flat without curling at the corners.
Make the three gift tags from the tag template, folding and stitching each one and threading a short cord, so the wraps can be labelled without tape or paper tags. A tag that is stitched, not glued, will survive washing and reuse, just like the wraps themselves. Keep the tags with the wraps in storage, so the set stays complete from year to year.
Fold it the Furoshiki way
Centre each gift diagonally on its wrap, fold the corners in over the gift, and knot two opposite corners on top, which is the classic Furoshiki carry knot. The knot is also the handle: carry the parcel by the knot, and it will hold, because the knot tightens under weight instead of loosening. Keep the knot on top, not at the side, because a top knot carries the weight evenly and looks like a bow, while a side knot slides off in a bag.
Match the wrap to the gift, and the wrapping becomes easy. The small wrap suits books and small boxes, the medium suits clothes and toys, and the large wrap suits big boxes and awkward shapes that paper never covered properly.
The fit check: wrap your own gifts first
Wrap your own gifts before gifting, and confirm each gift is fully covered with enough corner left to knot securely. That fit check matters, because a wrap that is just big enough on paper may be too small once the gift has depth, not just width. Test with the bulkiest gift you plan to wrap, not the flattest, and test the knot by carrying the parcel around the house. A wrap that survives a trip round the house will survive a trip to the recipient.
If a wrap curls at the corners after washing, press it from the back with steam and a pressing cloth, and it should lie flat again. Wash the wraps gently, on a cool cycle, and dry them flat or hang them to dry, just like any quilted cotton. Avoid very hot water on the first wash, because it can shrink the outer and lining at different rates if one fabric was not pre-washed.
Mistakes that spoil an otherwise good wrap
Quilting too tightly
The most common mistake is quilting a wrap like a placemat, with dense lines that make it stiff. A wrap needs to fold and knot, and dense quilting fights both. Keep the quilting lines 8 cm apart, and test-fold the small wrap round a book before quilting the large one. The spacing that folds well at 45 cm is the spacing to repeat at 75 cm.
Wrap once, use for years
Fabric wraps change the economics of Christmas wrapping completely. One set of three wraps, used every year, replaces dozens of rolls of paper, and the wraps themselves become part of the tradition: the same red print, the same knot, the same tags, year after year. Recipients start to recognise the wraps, and some will even return them, which is the highest compliment a reusable wrap can get.
Store the wraps flat, stacked, with their tags, not rolled or folded tightly, so they keep their square shape and lie flat when they are needed.
For a smaller project in the same spirit, the Crochet Christmas Bell Ornaments for Beginners guide makes a set of four tree ornaments from scraps of yarn. For the full set with a printable tag template, the Quilted Reusable Fabric Gift Wraps Sewing Pattern gives you a full illustrated PDF instant download, with the Furoshiki folding guide and every step diagrammed.
A November project with a December payoff
Fabric gift wraps are one of the most satisfying Christmas sewing projects, because they are useful, reusable, and genuinely better than the paper they replace. The squares are simple, the sewing is straightforward, and the result is visible under every tree you visit.
Ready to start? Choose a medium-scale print, quilt widely, press the edges flat, and test-fold every wrap round a real gift. Make a set for yourself, make a set for a gift, and keep the method in mind for next year. Once you can make a flat, square, well-finished wrap, you have the core skills for larger quilted projects, from table runners to quilts, and a wrapping habit that never needs a roll of paper again.
Ready to sew the set? Get the Quilted Reusable Fabric Gift Wraps Sewing Pattern and read Crochet Christmas Bell Ornaments for Beginners next.