Why a topper, and why 90 cm
A table topper is the piece that makes a Christmas table look finished without covering it completely. A full tablecloth hides the table; a runner covers only the middle; a topper sits in the centre, frames the centrepiece, and leaves room for plates round all four edges. At 90 cm square, a topper suits most dining tables: large enough to anchor a centrepiece and a few candles, small enough that nobody’s plate sits on top of it.
Learning how to sew a quilted christmas table topper is also a good bridge project. It uses the same skills as smaller quilted pieces — piecing, layering, quilting, binding — but at a scale where those skills have to be done properly, because a 90 cm piece shows every pucker and every unsquare corner. If you can quilt a topper flat, you can quilt anything.
The design: medallion, then borders outward
Centre medallion
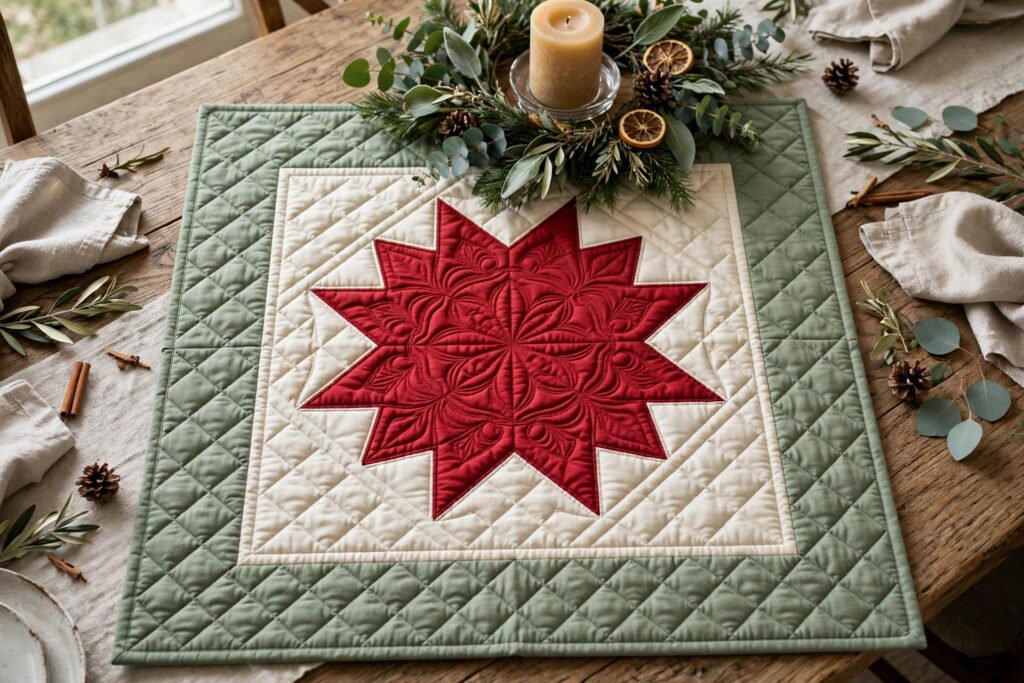
The centre of this topper is a red star medallion on cream. A star reads as Christmas without needing any novelty print, and it gives the topper a clear focal point, which matters because a topper without a focal point looks like a large placemat. Piece the star carefully, pressing every seam to one side and trimming dog-ears as you go. Sharp points come from accurate seam allowances and pressing, not from luck, so measure your quarter-inch seam and keep it consistent.
Borders
Round the medallion goes a cream inner border on all four sides, then a sage outer border that completes the 90 cm square. The cream border gives the star room to breathe; without it, the star would crowd the edge and the design would feel cramped. The sage border frames the whole piece and ties it to the rest of a Christmas table, where green is already present in garlands and centrepieces. Add the borders in order, inner first, then outer, and press after each round.
Step 1: Piece the top and square it
Piece the medallion first, then the borders, pressing as you go. When the top is complete, measure it through the centre, not along the edges. Edges stretch during handling, and the centre measurement is the true size. The finished top should measure 90 cm square through the centre in both directions.
Square the corners before you go any further. A top that is not square now will not lie flat later, and no amount of quilting will fix a top that is a parallelogram. If one side measures 91 cm and the opposite side measures 89 cm, ease the longer side in while you layer and baste, and trim to square after quilting.
Step 2: Layer, baste generously, quilt
Basting matters more at this size
Layer the quilt top over batting over backing and baste every 10 cm. A 90 cm top shifts more than a napkin, and basting is what stops the puckers. Pin basting works, but thread basting in a grid is even better for a piece this size, because pins can distort the layers when you move a large piece around the machine. Whichever method you choose, baste more than you think you need. You can always remove basting; you cannot easily remove a pucker quilted into the middle of a topper.
Quilt along the structure
Quilt along every border seam, and add diagonal lines through the medallion for texture. Quilting along the seams, sometimes called stitch in the ditch, anchors the layers and emphasises the design. The diagonal lines in the medallion add texture where the design is otherwise flat. Keep your stitch length a little longer than for garment sewing, around 3 mm, and work from the centre outward so fullness pushes to the edges, where it can be trimmed, rather than gathering in the middle.
Step 3: Trim, bind and lay flat
Trim the quilted topper to exactly 90 cm square and bind all four edges in one run, mitring the corners for a clean finish. You need about 3.8 metres of binding, cut 6 cm wide. A sage binding that matches the outer border gives a quiet, finished edge; a red binding that matches the medallion gives a bolder frame. Either works, but choose one and use it for all four edges so the frame reads as intentional.
Press the finished topper flat and lay it on a table. Check that all four corners lie down without curling. If one corner curls, press it again and add a small stitch through the binding at that corner to hold it down. Then centre the topper on the table and check the medallion sits in the middle of the table, not offset to one side. A topper that is off-centre by a few centimetres is noticeable in a way that a slightly off-centre runner is not, because the topper’s symmetry is its whole design.
Common mistakes and how to avoid them
Measuring along the edges
Edges stretch. Measure through the centre. If you only remember one measurement rule from this guide, make it this one.
Skimping on basting
A large piece basted like a small piece will pucker. Baste a grid before quilting, and keep the basting in until the quilting is done.
Quilting from the edge inward
Quilting from the edge pushes fullness toward the centre, where it gathers into a bubble. Always work from the centre outward, in every direction.
Rushing the binding
Binding a 90 cm square takes longer than binding a napkin, and the temptation to rush the corners is real. Mitre each corner properly and press it before sewing past it. The corners are the most visible part of the finished edge.
Fitting the topper to your table
Before you gift a topper, measure the recipient’s table if you can. A 90 cm topper needs a table at least 120 cm across to leave sensible room for plates round all four edges. On a smaller table, the same design at 75 cm square works better, and the pattern scales down simply by narrowing the borders. The medallion stays the same; only the border widths change. This is worth knowing, because a topper that is too big for its table gets folded away, while one that fits gets used every Christmas.
Matching the rest of the table
A topper pairs naturally with quilted hot pads and napkins in the same fabric story. One shared colour — the sage of the border, or the red of the medallion — is enough to tie the pieces together. Our guide to quilted hot pads uses the same layering and binding method at a smaller scale, so if you sew the topper first, the hot pads will feel easy, and if you sew the hot pads first, the topper will feel familiar.
The pattern, if you want the template
If you would like the full-size template for the backing and batting, the medallion and border layout, and the step-by-step guide in one printable document, the Quilted Christmas Table Topper sewing pattern is available as an instant-download PDF. It is a beginner-friendly pattern: straight seams, one binding method, and clear notes on squaring a large piece.
Start with the star
If the size of this project feels daunting, start with just the star medallion. Piece it, press it, and admire it. The medallion is the hardest part in miniature, and once it is done, the borders are straightforward. Add the borders, quilt it, bind it, and you will have a table topper that anchors the Christmas table — and proof that you can quilt at full size.
Ready to sew it? Get the Quilted Christmas Table Topper sewing pattern and read quilted hot pads next.