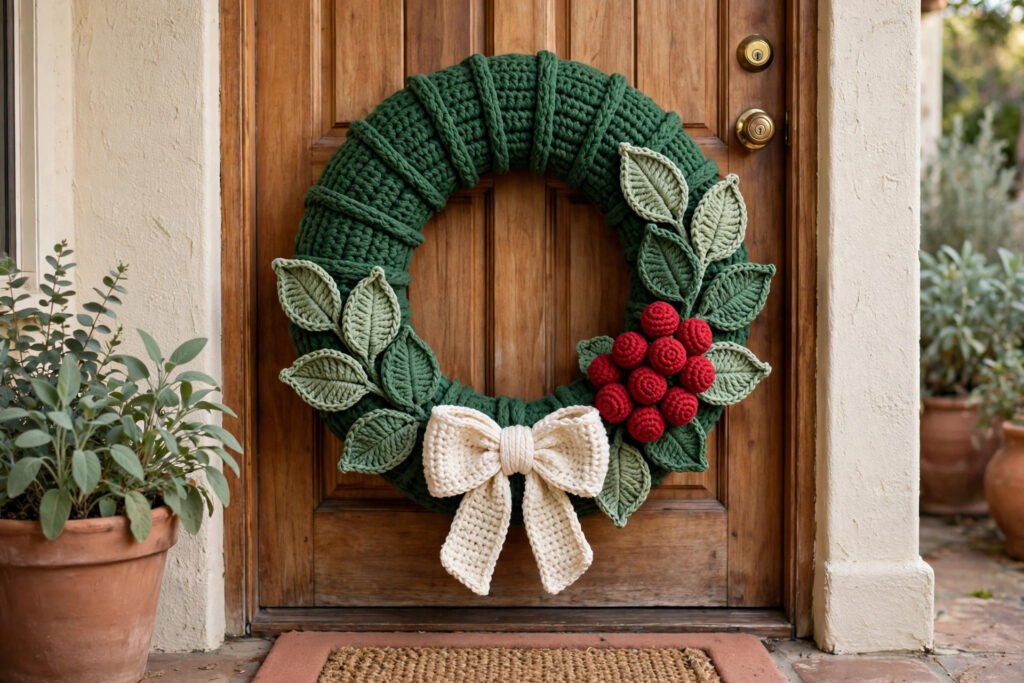
Why a crochet wreath beats a shop-bought one
A crochet wreath is soft, light, and washable, which makes it kinder to a painted door than a wire-and-pine wreath, and it folds flat for storage in January. Learning how to crochet a christmas wreath is also a wonderfully forgiving big project: it is made of small repeated pieces, so you can stop and start as often as you like, and no single piece needs to be perfect, because the overall round shape and the festive colours do most of the visual work.
The wreath in this guide finishes at about 30 cm across, which suits a standard front door without overwhelming it.
Start with the ring, not the leaves
Gauge first, always
Many beginners want to start with the pretty leaves, but gauge comes first. Work a test square and count stitches across 10 cm, because you want 20 stitches for this wreath so the ring covering stays firm and even. If your count is loose, go down a hook size, and if it is tight, go up a hook size, until 20 stitches fill 10 cm. A wreath crocheted too loosely will sag at the bottom, and one crocheted too tightly will be hard to shape round the ring.
The ring is the foundation
You can make the ring in two ways. The simplest is to chain a length, join it into a ring, and work single crochet stitches around it until it feels firm. The second is to work around a craft ring about 25 cm across, which gives a very even shape and helps the wreath keep its roundness in storage. If you use a craft ring, cover it completely with single crochet stitches, pulling each stitch snug so no ring shows through. A weak or uneven ring will make the whole wreath look lopsided, no matter how neat the leaves are, so check that the ring is round before adding anything else.
Crochet leaves that look like leaves
Leaves are the part beginners worry about most, and they are simpler than they look. Each leaf in this guide is a small oval or pointed shape, worked in rows, with a slightly pointed tip. Work the leaf flat, turn at the end of each row, and decrease near the tip so it comes to a soft point rather than a blunt end. Keep the same hook and tension for the ring, the leaves, and the berries, so the parts match when they are assembled.
Make all your leaves before you sew any of them on. That way you can compare sizes and choose the most even ones for the front of the wreath. Aim for eighteen to twenty leaves for a 30 cm wreath. Fewer leaves can leave gaps where the ring shows through, while too many leaves can make the wreath look crowded and heavy. Lay the leaves around the ring on a table first, without sewing, and check the spacing from a normal viewing distance, which is how the wreath will actually be seen on a door.
Add berries, a bow, and a hanging loop
Berries in a cluster, not scattered
Berries give the wreath its Christmas colour and its focal point. Crochet nine small red balls, stuffing each one very lightly so it holds a round shape without stretching the stitches. Sew them in a small cluster, usually at the bottom of the wreath or slightly to one side, rather than scattering them all around the ring. A cluster reads as a deliberate decoration, while scattered berries can look like random dots, and a cluster also gives the bow something to frame.
A bow in proportion
A cream bow, made from ribbon or a small crochet chain bow, finishes the cluster well, but keep it in proportion to a 30 cm wreath. A tiny bow will disappear on a door, and a huge bow will hide the berries and pull the wreath sideways when it hangs. If you prefer a plainer look, skip the bow and let the berries do the work. Both versions look finished, as long as the berries are secure and evenly sized.
A loop that holds the weight
Fold a 30 cm length of ribbon into a loop and sew it firmly to the top of the ring, through the covering and the ring itself where possible, with several strong passes. Knot it securely on the back, and tug it firmly before you hang the wreath. A 30 cm wreath is heavier than a tree ornament, so a loop sewn through two stitches alone may not be enough. Test the loop by hanging the wreath and leaving it for an hour, and check that it has not slipped or stretched.
Getting the shape and tension right
Tension matters more for a wreath than for a scarf, because a small change in size changes the proportions of the whole piece. If your ring comes out much larger than expected, your stitches are loose. Try a smaller hook rather than pulling your yarn tighter, which tires your hands and can make the stitches uneven. Work a small test piece first if you are using a new yarn, and compare it with the size you want before committing to a full ring covering.
Stuffing, where it is used, should be light. Berries need only a pinch of stuffing to stay round. Overstuffing stretches the stitches and shows white fibre through the yarn, which is especially visible on red berries. Squeeze each berry gently after stuffing. It should spring back, not stay dented, and you should not be able to see stuffing through the stitches.
Hanging it well, and storing it well
Hang the wreath on a door or hook and step back: it must hang level with its face forward, not tip toward the berry cluster. A wreath that tips usually has its berries too low and too heavy on one side, or a loop sewn off-centre. Shift the loop a fraction toward the heavy side, or move one berry, and the wreath will level out. Check that the 30 cm wreath clears your door handle and letterbox, because a wreath that catches the handle every time the door opens will not stay level for long.
For a smaller project in the same palette, the How to Sew Quilted Christmas Coasters guide uses the same red, cream, and green story on a table scale. For the full wreath with stitch counts and assembly diagrams, the Crochet Christmas Wreath Pattern gives you a full illustrated PDF instant download, with every piece charted step by step.
Mistakes that spoil an otherwise good wreath
Starting with the leaves
The most common mistake is starting with the leaves, because they are the pretty part, and then discovering the ring is uneven once the leaves are on. Work the ring first, check that it is round, and only then add leaves. A wreath built on a round ring will look round, and a wreath built on a lopsided ring will not, no matter how beautiful the leaves are.
A weekend project worth the door
This wreath is a weekend project, not an evening one, but it repays the time every day of December, because it is the first festive thing visitors see. The skills are all beginner-level: chains, single crochet, simple increases, and a little sewing. None of them needs to be perfect to look good, because the overall round shape and the festive colours do most of the visual work.
Ready to start? Choose a green you love, cover the ring first, lay the leaves out before you sew them, and keep the berry cluster small and secure. The result will be a wreath that hangs level, frames a door, survives storage in a box, and comes back out every December looking just as cheerful as the year you made it.
Ready to crochet it? Get the Crochet Christmas Wreath Pattern and read How to Sew Quilted Christmas Coasters next.