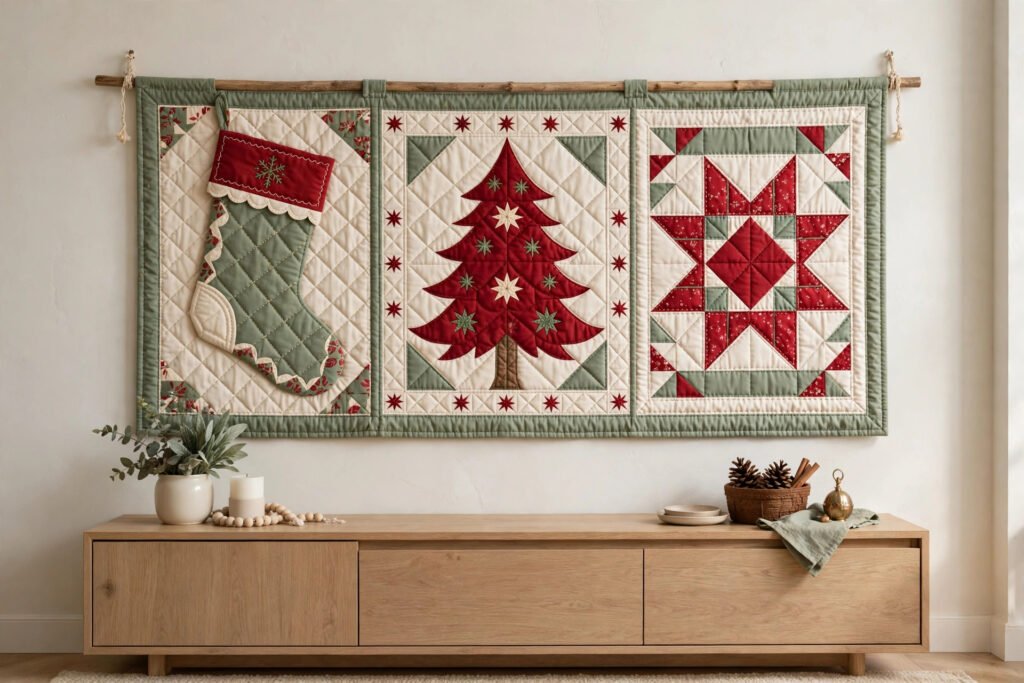
A quilted wall hanging is one of the most rewarding Christmas sewing projects, because it turns a plain wall into a festive display without taking up floor space. Learning how to sew a quilted christmas wall hanging sounds ambitious, but this design breaks the work into three simple blocks: a tree, a star, and a stocking. Each block is beginner-friendly on its own, and together they finish at 60 x 80 cm, a generous size that shows up well on a wall without overwhelming a room.
The three-block structure is also forgiving. You make each block separately, so a mistake in one block does not spoil the others. You can even swap the order of the blocks, or repeat a favourite block, and still end up with a balanced hanging.
Why Three Blocks Work So Well
A single large Christmas picture in fabric is hard to piece accurately, because every seam affects the whole design. Three separate blocks keep the piecing manageable. Each block is roughly square, each uses simple shapes, and each can be squared up to the same size before you join them.
The finished hanging measures 60 x 80 cm. That size suits a hallway, a living room wall, or the space above a sideboard. It is large enough to be a focal point, but small enough to quilt on a home machine without wrestling yards of fabric. If you want the full printable version, the Quilted Christmas Wall Hanging pattern on loomvella.com gives you the illustrated step-by-step guide as a PDF instant download, with full-size templates for all three blocks.
Choosing Fabric for Three Blocks
Choose a fabric palette before you cut anything, and stick to it across all three blocks. A simple palette works best: one strong Christmas red, one deep green, one warm cream, and one gold or mustard for accents. Using the same four fabrics in every block is what makes the hanging look like a single designed piece rather than three unrelated squares.
Use quilting cotton throughout. It presses crisply, holds a crease for accurate piecing, and comes in the prints and solids this project needs. For the backing, a plain cotton in cream or red works well. For the batting, a low-loft cotton batting gives the hanging enough body to drape flat against the wall without sagging.
Block One: The Tree
Piecing a Simple Triangle Tree
The tree block is the most recognisable of the three, and the simplest to piece. It is built from stacked triangles in green, each row slightly wider than the one above, with a small brown trunk at the bottom and a cream or gold background around it. The triangles do not need to be perfect points, because the overall shape reads as a tree even when the points are slightly blunt.
Sew the rows together from the top down, pressing each seam to one side as you go. Pressing matters more than speed here, because a block that is pressed well will square up accurately, and a block that is not pressed will drift out of shape. Trim the finished block to the same size as the other two blocks, and set it aside.
Adding Simple Decorations
Block Two: The Star
Building a Star From Diamonds
The star block uses a classic eight-pointed star, built from diamond shapes in gold and cream. Diamonds sound tricky, but they are simply two triangles sewn together, and the pattern templates take the measuring out of it. Sew the diamonds into pairs, then join the pairs into the full star, pressing carefully at each stage so the centre point stays neat.
The centre of the star is where eight seams meet, and that point is the test of the block. Press the seams in a pinwheel arrangement, so the bulk is spread evenly around the centre rather than piling up on one side. A flat centre point makes the whole block sit better and quilt more evenly.
Background and Balance
Block Three: The Stocking
A Stocking Shape in a Square
The stocking block is the most playful of the three. It features a stocking shape, pieced from a red body, a cream cuff, and a small heel and toe in a contrasting fabric. The stocking shape is appliqued onto a background square, which keeps the piecing simple while still giving a clear, recognisable shape.
Appliqué the stocking by turning the edges under and stitching close to the edge, or by using fusible web and a blanket stitch around the outline. Either method works, and the choice is mostly about which finish you prefer. A blanket stitch in a contrasting thread adds a folksy, hand-finished look that suits a Christmas hanging.
The Cuff Detail
Joining, Quilting, and Finishing
Once all three blocks are pieced and trimmed to the same size, join them in a row or a column. A row of three blocks gives a wide hanging that suits a space above a fireplace, while a column of three gives a tall hanging for a narrow wall. The finished size is 60 x 80 cm either way, so choose the arrangement that fits your wall.
Add a border if you like, in one of the palette fabrics, to frame the blocks and bring the hanging to its full 60 x 80 cm size. Borders also give you a margin for the quilting and binding, which is useful when the blocks themselves are already at their finished size.
Quilting the Hanging
Layer the top, batting, and backing, and quilt with simple lines. Straight lines along the block seams, sometimes called stitch in the ditch, are a safe and attractive choice that lets the piecing do the talking. Alternatively, quilt a simple grid across the whole hanging. Keep the quilting lines reasonably close, about five to eight centimetres apart, so the hanging stays flat against the wall.
Bind the edges with bias tape or straight binding in a coordinating solid. Attach a hanging sleeve to the back, which is simply a tube of fabric sewn across the top, so the hanging can be displayed on a rod or a narrow wooden batten. A sleeve distributes the weight evenly and keeps the hanging straight, which a row of clips or pins will not do.
Hanging and Storing Your Work
Hang the finished piece where it will be seen but not handled constantly. A hallway or living room wall is ideal. Avoid hanging it directly above a radiator, because heat can fade fabric over time, and avoid a spot where it will be brushed past every day, because repeated handling wears the binding.
If you enjoy making coordinated Christmas sewing, the matching tea cosy project in How to Sew a Quilted Christmas Tea Cosy That Fits Your Teapot uses the same quilting skills, so it makes a natural second project once the wall hanging is done.
A Wall Display You Made Yourself
A quilted wall hanging is a statement piece, but it is built from beginner skills: straight seams, simple triangles and diamonds, a little appliqué, and straightforward quilting. The three-block design keeps each stage short and satisfying, and the finished 60 x 80 cm hanging is something you will be proud to put on the wall year after year.
Ready to make yours? Get the full illustrated Quilted Christmas Wall Hanging pattern as a PDF instant download on loomvella.com, with full-size templates, fabric requirements, and step-by-step diagrams for every stage above.